PCB Guide Part 2 - Beginning the project
At this point in the guide you should have:
- GitHub with a fresh repository
- KiCad installed onto your workstation
2.1 Creating the KiCad Project
From last part's GitHub setup, you should have a new folder in home/Documents/GitHub with the project name. This is where we will be doing all of our work.
![image-1546903081298[1].png](https://wiki.kbatelier.org/uploads/images/gallery/2024-10/scaled-1680-/EfhbbyplzyOpkvdp-image-15469030812981.png)
Many of the images in this guide are older and using a 5.1.x version of KiCad. We are in the process of updating these images as we rebuild this wiki.
In the meantime, the information is still roughly the same, but icons and layouts may look different.
Launch KiCad, and you will be greeted with the main menu.
![image-1546903202785[1].png](https://wiki.kbatelier.org/uploads/images/gallery/2024-10/scaled-1680-/qppHrR1mTS6GV0Mt-image-15469032027851.png)
![image-1546903232123[1].png](https://wiki.kbatelier.org/uploads/images/gallery/2024-10/scaled-1680-/9qEkR7C1lYKk3heF-image-15469032321231.png)
Browse to your repository directory from the beginning of this section.
Ensure you uncheck "Create a new directory for the project". If checked, your project will be created in an additional subdirectory.
![image-1546903292979[1].png](https://wiki.kbatelier.org/uploads/images/gallery/2024-10/scaled-1680-/2rbXYMyrQicfW2Py-image-15469032929791.png)
KiCad will the generate basic project files.
![image-1546903447318[1].png](https://wiki.kbatelier.org/uploads/images/gallery/2024-10/scaled-1680-/latUKgCTtmoFBjzV-image-15469034473181.png)
Editor's Note: Need to confirm that these are the only two files that are still generated in a new project.
The default project only has two files:
- The .sch file - Contains the schematic, or the electrical layout. This is where you will add the parts and wire them together, so KiCad knows what you're trying to accomplish.
- The .kicad_pcb file - Contains the physical layout. This is where you take the data from the schematic, and position and connect them all together for production.
The basic workflow is to create the schematic first so that the electric side is all set, then to lay it out on a physical PCB based on that.
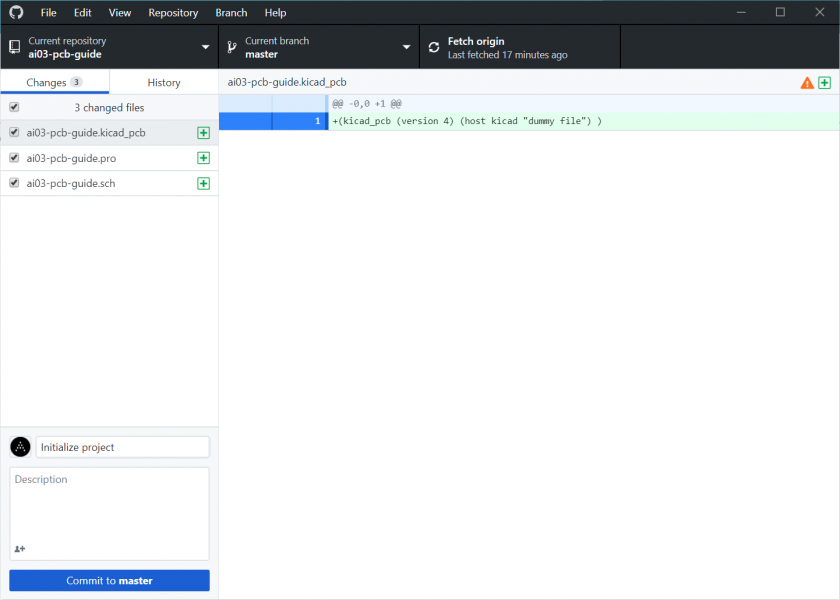
2.2 First Commit
With the basic project set up, now is a good time to commit our changes to GitHub.
Give the commit a name, commit, and push the changes.
This guide will remind you from time to time to commit after large milestones; however, it is good practice to not only save often in KiCad but also commit to GitHub relatively often. Losing work is not something you want to experience.

Committing to your repo

Pushing the changes
2.3 Add Local Libraries
KiCad is built around libraries - A collection of footprints, and often schematic components bundled with it.
Footprints are the building blocks of PCBs - The sets of copper pads that the components attach to.
KiCad ships by default with support for common electrical components, such as resistors, capacitors, microcontrollers, etc. It does not ship with exotic things, such as Cherry MX footprints, very specific USB connectors, etc. So, let's take care of that.
KiCad supports two library install types:
- Global - The library is added to the computer. This means you only have to install the library once. However, this has the massive downside of requiring that the library be installed to view the project on another computer. This can be a hassle, especially if having the project checked by others
- Local, or Project-Specific - The library is added only for the specific project. This means you will have to install the library each time; however, the project can be shared instantly without any worry about compatibility or missing libraries.
For this exercise, we'll be using project-specific libraries.
2.3.1 Adding the Footprint Library Data
First, we will need to pick which footprint libraries to use. In this guide, we will be making use of the following repositories:
- The ai03 MX_V2 footprint library for switches:
https://github.com/ai03-2725/MX_V2 - The ai03 random keyboard parts library for the USB connector:
https://github.com/ai03-2725/random-keyboard-parts.pretty
We will be adding these to our project as Git Submodules. This allows us to pull new changes from them without having to manually download and overwrite the existing files.
Since the GitHub desktop application is fairly awful at managing submodules, we will opt for using the shell instead.
![image-1546904532041[1].png](https://wiki.kbatelier.org/uploads/images/gallery/2024-10/scaled-1680-/0jbdeQFYHzs3pigx-image-15469045320411.png)
Then, run the following commands:
git submodule add https://github.com/ai03-2725/MX_V2and
git submodule add https://github.com/ai03-2725/random-keyboard-parts.pretty![image-1546904672159[1].png](https://wiki.kbatelier.org/uploads/images/gallery/2024-10/scaled-1680-/nnWHG2QKJiBDR1BD-image-15469046721591.png)
Since the GitHub Desktop GUI seems to have issues with committing submodules, let's also do this from the command line.
git add *
git commit -m "Add submodules"
git push
These commands add the new submodules to the commit, then creates a commit with the given name/description, and pushes it to GitHub.
After the push finishes, you should be able to see that the library repos are linked in your GitHub repo.
![image-1546904793529[1].png](https://wiki.kbatelier.org/uploads/images/gallery/2024-10/scaled-1680-/FbuHkAGnjsSl7Tct-image-15469047935291.png)
We now have the libraries in our working directory, but we still need to add them to the project itself.
2.3.2 Adding the Schematic Footprint Libraries to KiCad
In KiCad, open up your schematic file:
![image-1546905987349[1].png](https://wiki.kbatelier.org/uploads/images/gallery/2024-10/scaled-1680-/FLihABcUNGGXUWGW-image-15469059873491.png)
![image-1546906018099[1].png](https://wiki.kbatelier.org/uploads/images/gallery/2024-10/scaled-1680-/JbqKYgGsCc21Kwwp-image-15469060180991.png)
Select the tab Project Specific Libraries, then Browse Libraries (the folder icon):
![sdajfklasdjfkasjdkfklasdjf[1].png](https://wiki.kbatelier.org/uploads/images/gallery/2024-10/scaled-1680-/Ddx3qb3L3g1Hx788-sdajfklasdjfkasjdkfklasdjf1.png)
Now select the .lib files inside each of the added libraries:
This image needs to be updated for the V2 library![image-1559442884054[1].png](https://wiki.kbatelier.org/uploads/images/gallery/2024-10/scaled-1680-/lowCG3muYC9Ig5Gd-image-15594428840541.png)
After checking that both libraries are added, confirm the changes by pressing OK.
![image-1546906679194[1].png](https://wiki.kbatelier.org/uploads/images/gallery/2024-10/scaled-1680-/kNPayCx7toomtRDl-image-15469066791941.png)
You may close the schematic editor for now.
2.3.3 Adding the PCB Footprint Libraries to KiCad
Open up the PCB Editor file:
![image-1546906749941[1].png](https://wiki.kbatelier.org/uploads/images/gallery/2024-10/scaled-1680-/hemq4J8NKBJUOtGw-image-15469067499411.png)
Similar to the Schematic libraries, navigate to Preferences -> Manage Footprint Libraries, and select the tab Project Specific Libraries, then Browse Libraries (the folder icon), and browse for the added .pretty folders. For this guide, we will be using the MX_Alps_Hybrid style footprints.
Once again, click OK to confirm the changes and close the PCB editor.
2.3.4 Commit the changes
Commit and push your changes to your repo. For this commit, confirm you have both the fp- and sym-lib-table files. If you don't see them, make sure you've clicked OK when adding the libraries instead of simply closing the dialogs.
![image-1546906924181[1].png](https://wiki.kbatelier.org/uploads/images/gallery/2024-10/scaled-1680-/kQvNecG7IEHlAitL-image-15469069241811.png)
Now you're ready to start making your first keyboard!
Time to [[begin the schematic]].
![image-1559442823691[1].png](https://wiki.kbatelier.org/uploads/images/gallery/2024-10/scaled-1680-/Appzt5ao7WzSY0ed-image-15594428236911.png)